When businesses upgrade hosting plans or switch providers, one of the biggest challenges is migrating email accounts without disrupting day-to-day communication. A poorly planned migration can lead to downtime, data loss, or security risks, all of which can hurt productivity and customer trust.
EdbMails IMAP Migration Tool eliminates these concerns with a streamlined, secure, and automated approach to transferring emails between cPanel servers. Whether you’re moving a single mailbox or hundreds, EdbMails ensures zero downtime, preserves folder hierarchy, and keeps your data safe with industry-standard encryption.
Why Choose EdbMails for cPanel to cPanel Migration?
- Secure Data Transfer: End-to-end encryption (SSL/TLS) and OAuth 2.0 authentication.
- Incremental Migration: Transfers only new or updated emails in repeated runs, avoiding duplicates.
- Auto Mailbox Mapping: Automatically matches source and target accounts to save time.
- Concurrent Migrations: Move multiple mailboxes at once for faster completion.
- Compliance Ready: ISO 27001:2013 certified, GDPR, and HIPAA compliant.
Step-by-Step Guide to Migrate Emails from cPanel to cPanel with EdbMails
Migrating between cPanel servers with EdbMails is an easy process that requires minimal technical expertise.
1. Install and Set Up EdbMails
Download the EdbMails IMAP Migration software from the official website and install it on your system. Launch the application, log in with your registered email, or click on free trial if you’re new.
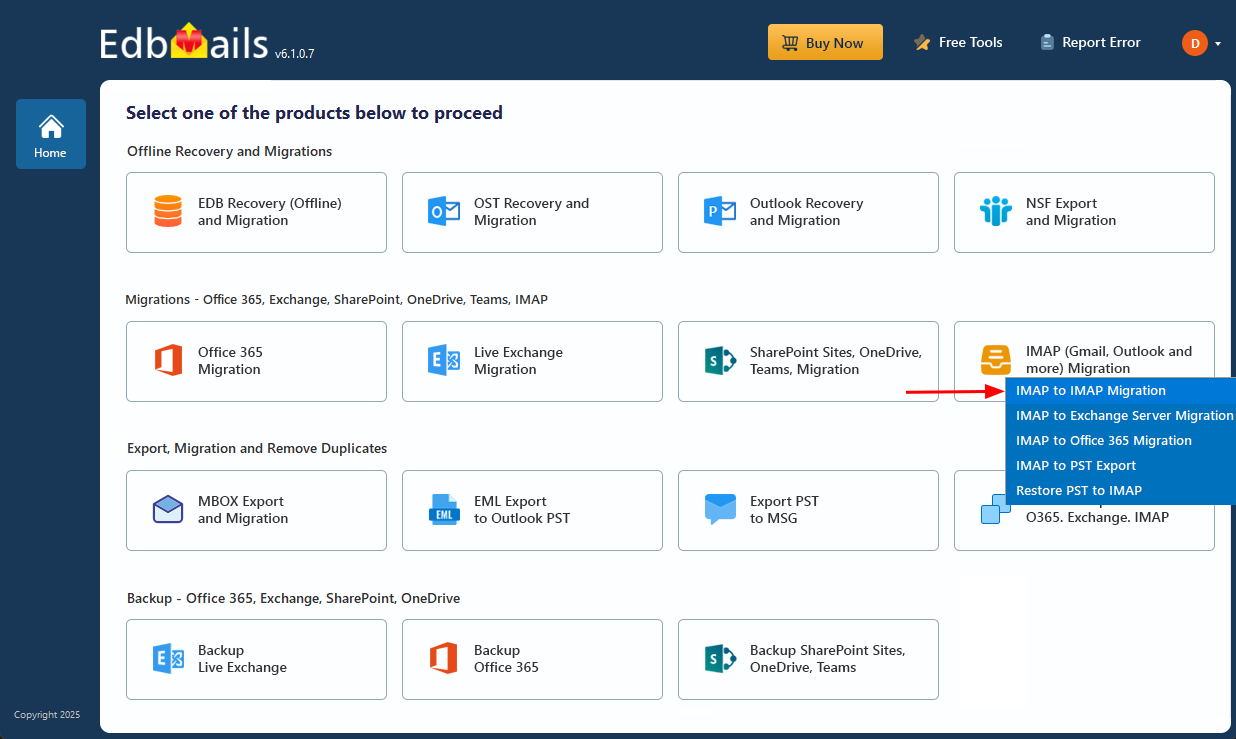
From the main dashboard, choose IMAP (Gmail, Outlook & more) Migration, then select IMAP to IMAP Migration.
2. Connect to the Source cPanel Server
For single mailbox migration, select Single User / Account Migration and enter your cPanel IMAP server hostname, email address, and password. For bulk migrations, download the sample CSV file, fill in the source email details (address, password, hostname, port), save it, and upload it to EdbMails.
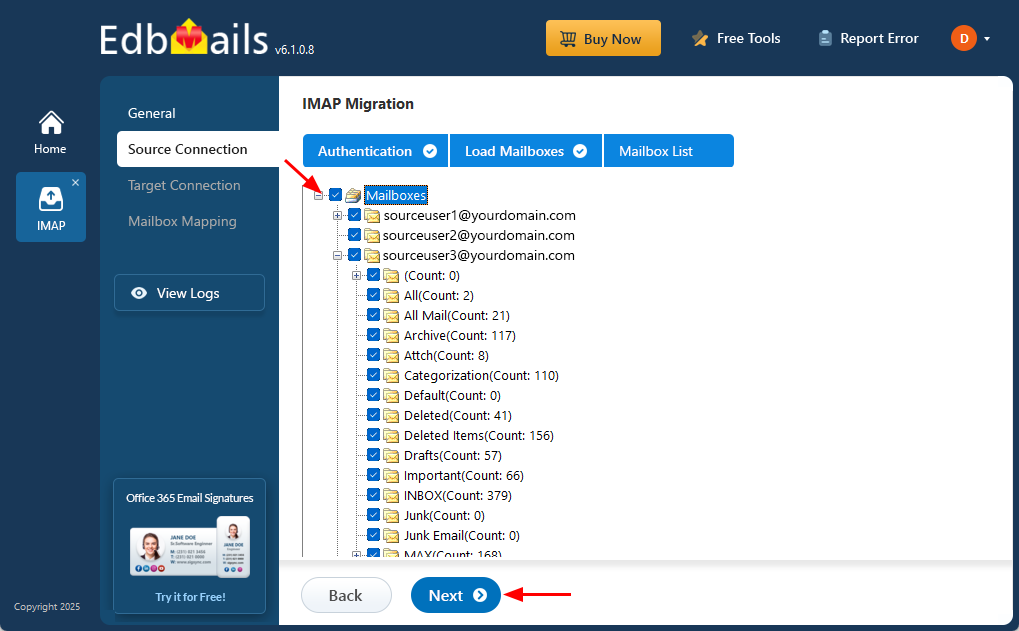
3. Select Mailboxes or Folders to Transfer
EdbMails allows you to choose entire mailboxes or specific folders. This selective migration is ideal for avoiding unnecessary data transfer (like spam or large unused attachments).
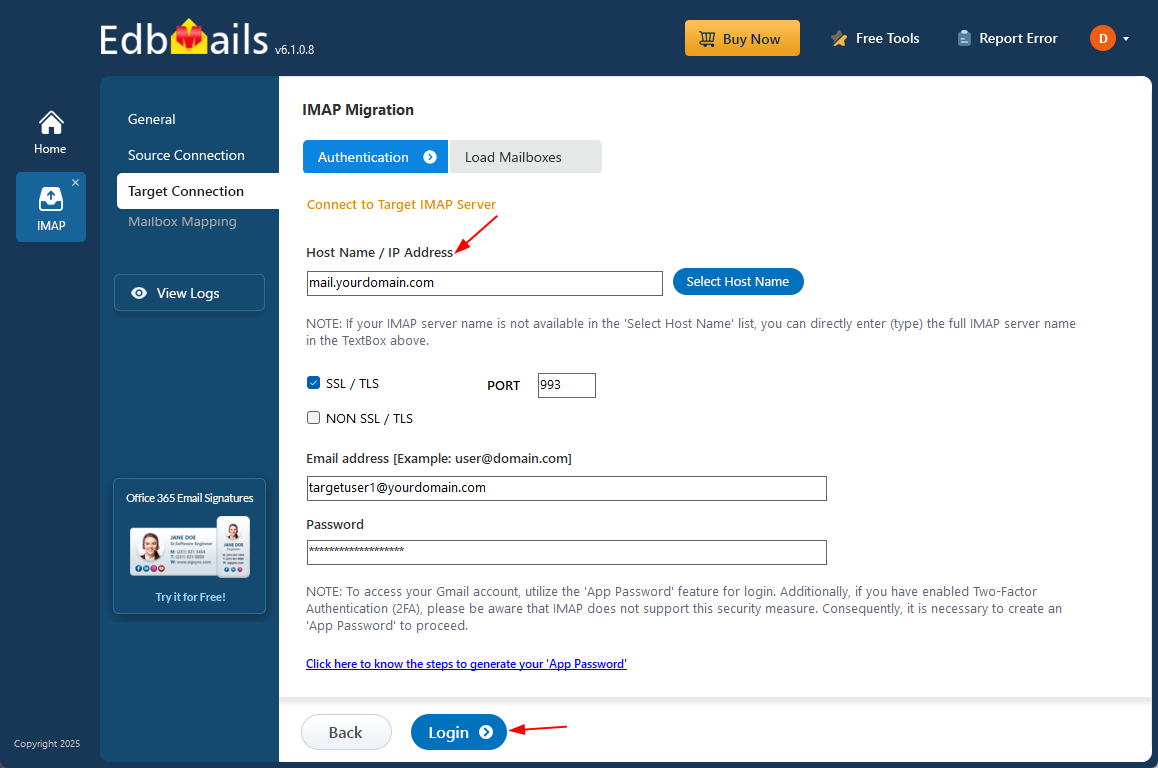
4. Connect to the Target cPanel Server
Use the same process as the source connection, but provide the target cPanel server details. Bulk migrations can also be handled via CSV import.
5. Map Source and Target Mailboxes
EdbMails automatically aligns mailboxes between servers, but you can adjust mappings manually if needed. This ensures that folders and messages land exactly where they should.
6. Start the Migration
Click “Start Migration” to begin. The progress window will show the number of migrated emails, folders, and items. Once complete, you can view a detailed log report and verify the migration by logging into the target server.
Also Read:- Complete Detailed Step By Step cPanel to cPanel migration
Post-Migration Best Practices
- Verify All Data: Cross-check emails and folder structures on the target server.
- Update DNS/MX Records: Point your domain’s email routing to the new server.
- Test Functionality: Send and receive test emails to confirm stability.
- Inform Users: Notify team members about the migration completion and any minor changes.
Advantages of EdbMails for cPanel to cPanel Migration
| Feature | Benefit |
| End-to-End Encryption | Protects sensitive data during transit. |
| Zero Downtime | Email services remain active throughout the migration. |
| Incremental Sync | Only transfers new data in subsequent runs. |
| Folder & Structure Preservation | Keeps your mailbox layout intact. |
| Compliance Certifications | Meets GDPR, HIPAA, and ISO 27001:2013 standards. |
| Custom Folder Mapping | Flexibility to reorganize mailboxes during migration. |
Frequently Asked Questions (FAQs)
Q1. Can I migrate multiple accounts at once?
Yes, EdbMails supports concurrent mailbox migration to save time.
Q2. Will my folder structure remain intact?
Absolutely. The tool preserves the exact folder hierarchy during transfer.
Q3. Is technical knowledge required?
Minimal. EdbMails step-by-step wizard makes it easy for anyone to use.
Q4. How secure is my data during migration?
Data is encrypted using TLS and transferred securely with OAuth 2.0 authentication.
Conclusion
Migrating from one cPanel server to another doesn’t have to be complex or risky. With EdbMails IMAP Migration Tool, you can transfer mailboxes quickly, securely, and without downtime, ensuring your business communication remains uninterrupted.
Start your free trial today and experience effortless cPanel to cPanel migration.