Migrating your Hotmail (Outlook.com) emails to Office 365 can unlock advanced features and enhanced security, yet the process isn’t always straightforward. Manual methods involving PST exports and Outlook imports are cumbersome, risk data loss, metadata corruption, and often require Microsoft Outlook to be installed. That’s why an automated, secure, and metadata-preserving method matters.
EdbMails IMAP Migration Tool takes the headache out of this process. It offers a direct, one-to-one mailbox mapping from Hotmail to Office 365 without needing PST files, Outlook, or multi-step exports. You get full preservation of folder hierarchy, timestamps, and attachments.
Why Choose EdbMails Over Manual Methods?
- No Middle Steps: EdbMails enables direct Hotmail to Office 365 migration while preserving complete integrity.
- Full Metadata & Folder Preservation: Keeps every email’s original state intact, including date, read status, and structure.
- Incremental Migration Support: Only newly added data is synced, minimizing duplicates and bandwidth usage.
- Secure & Simple: Uses OAuth and encrypted connections to safeguard your data during transfer.
- Ease of Use: Clean, script-free UI ensures even non-technical users can navigate the process confidently.
Quick checklist (prerequisites)
Make sure you complete the following checklist before starting the migration process to ensure a smooth and error-free transfer.
- Download the latest EdbMails IMAP Migration tool: Download EdbMails.
- Ensure you have a Windows PC that meets EdbMails system requirements (check: System Requirements).
- Office 365 (Microsoft 365) admin account with Global Admin or the required migration privileges and an active mailbox license for each target user.
- Source Hotmail/Outlook.com credentials (email + password). If the account uses MFA, prepare an app password.
- Decide the migration approach: single-user, bulk (CSV), incremental re-runs.
- Notify users about expected windows and provide a communication plan.
Step-by-Step Hotmail Data to Office 365 Migration Using EdbMails
Step 1 – Install EdbMails
- Download EdbMails from the official website.
- Install and launch the application, and follow on-screen prompts.
- Log in with your registered EdbMails account or click Start Your Free Trial. The trial version allows you to migrate up to 30 items per folder, enabling you to test and validate the software’s functionality before purchasing.

Step 2 – Choose migration type: IMAP to Office 365
From the EdbMails dashboard:
- Select IMAP (Gmail, Outlook & more) Migration.
- Choose IMAP to Office 365 Migration so the tool will guide you for connecting both the source and the target.
- Provide a job name for the migration to proceed
Step 3 – Connect to Hotmail / Outlook.com (Source)
- Choose Single User (one mailbox) or Bulk / Multiple Users (CSV) depending on volume.
- Enter the IMAP hostname – typically imap-mail.outlook.com or outlook.office365.com, depending on your setup. Use port 993 with SSL/TLS. EdbMails also suggests hostnames in the UI. If not available, you can enter them manually.
- Click Login. The tool will validate the connection and display available folders/mailboxes.
If using CSV (for bulk migration):
- Download the sample CSV from the EdbMails software, update it with the source email, password, hostname, and port details, then save the file and upload it back to EdbMails
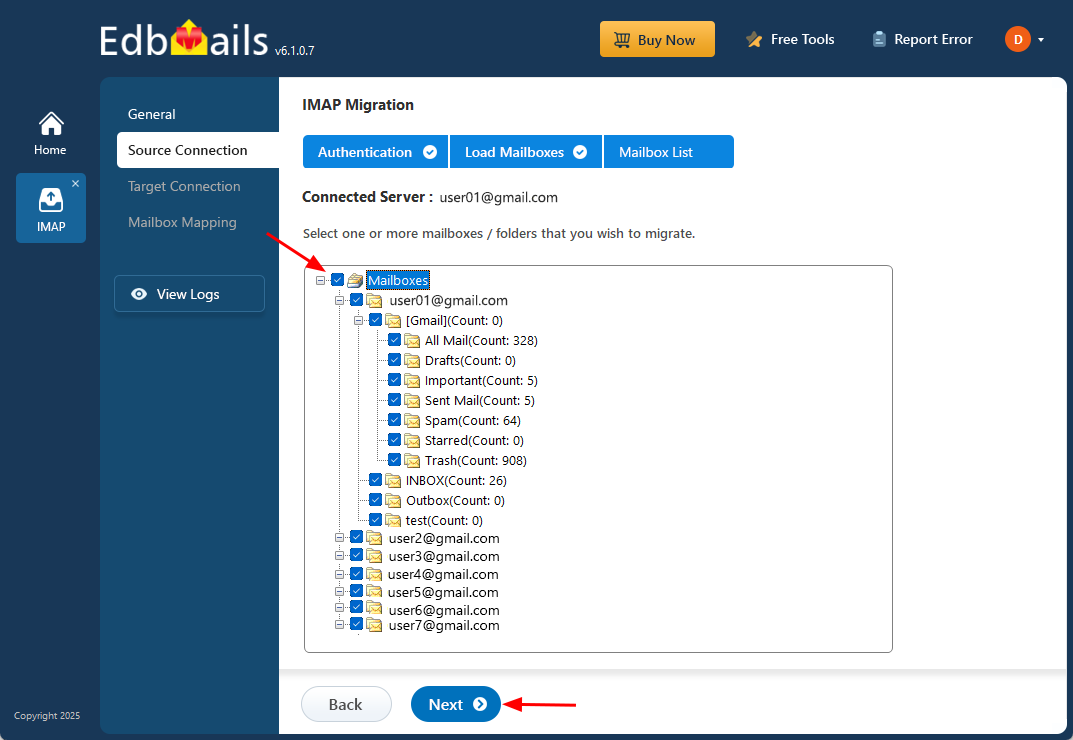
Step 4 : Preview & select mailboxes/folders
- EdbMails will show a tree view of the mailbox with folders (Inbox, Sent Items, Drafts, custom folders).
- Select entire mailboxes or specific folders you want to migrate (you may exclude Junk/Spam).
Step 5 : Connect to Office 365 (Target Server)
- Choose Connect to Office 365 and provide admin credentials. Use a Global Admin account.
- Select one of the methods to load the mailboxes. You can select “load Mailboxes Automatically” or load the mailboxes using a CSV file and click “Next”
Step 6 : Map source & target mailboxes
EdbMails offers three mapping modes:
- Automatic mapping – attempts to auto-match by email address or display name.
- Manual mapping – you have to manually map each source mailbox to a specific target mailbox.
- CSV mapping – prepare a CSV that maps source addresses to target addresses.
Choose the method appropriate for your environment, and verify mappings carefully (especially if source and target addresses differ).
Step 7 : Start migration & monitor progress
To login to the destination Office 365 account, enter the appropriate credentials and click on ‘Login’.
- Click Start Migration.
- Monitor live progress, item counts, errors/warnings, and the migration log.
- Use Pause or Stop only if necessary – otherwise let the job complete. EdbMails will handle retries for transient errors.
Step 8: Post-migration validation & sanity checks
After the migration finishes:
- Log into several Office 365 mailboxes and verify folder structure, message counts, attachments, read/unread status, and timestamps.
- Confirm that incremental re-runs do not duplicate items..
Conclusion
Migrating from Hotmail to Office 365 doesn’t need to be complex, time-consuming, or risky. With EdbMails IMAP Migration, you get a direct, secure, and intuitive solution that ensures full mailbox fidelity, optimized transfers, and minimal disruption.Start your migration confidently with EdbMails – download the free trial today and experience the most streamlined method to migrate your Hotmail mailboxes to Office 365 securely and effortlessly.