Introduction – Why Backup Zoho Mail to PST is Essential
Zoho Mail has become one of the most popular cloud-based email solutions for businesses, startups, and professionals looking for reliable communication and collaboration tools. Its ad-free interface, integration with Zoho Workplace apps, and affordable pricing make it a preferred choice for organizations of all sizes.
However, relying solely on Zoho’s cloud storage for your emails comes with certain risks. Like any other cloud email provider, Zoho does not guarantee complete protection against accidental deletions, server outages, cyber-attacks, or subscription changes. For businesses, even a small data loss can cause compliance issues, legal disputes, and productivity slowdowns.
This is why having an independent Zoho Mail backup strategy is critical. Exporting Zoho Mail data to PST (Personal Storage Table) files, which is the native format for Microsoft Outlook, is one of the most reliable methods to ensure long-term, offline access to your emails.
Common reasons why businesses backup Zoho Mail to PST:
- Accidental deletion protection – Emails deleted from Zoho may not be recoverable after a certain time.
- Ransomware or cyber-attacks – An offline PST backup ensures emails are safe even if accounts are compromised.
- Employee offboarding – Easily archive ex-employee mailboxes for future reference.
- Regulatory compliance – Certain industries require retaining communication records for years.
- Offline access – PST files can be opened in Microsoft Outlook anytime, without the internet.
- Data migration – PST files act as a bridge to move emails from Zoho to Office 365, Exchange, or another email platform.
Limitations of Manual Backup Methods
Zoho Mail offers options like IMAP sync with Outlook or exporting emails via EML/ZIP downloads. While these can work for small-scale backups, they have significant drawbacks:
- Manual exports are time-consuming and not practical for large mailboxes.
- Folder hierarchy may break during export, causing disorganization.
- Attachments, contacts, and calendar items may not export correctly.
- No support for incremental backup – duplicates may be created if you repeat the process.
- Bulk export of multiple users is not possible manually.
To overcome these limitations, you need a specialized backup solution that ensures data accuracy, speed, and ease of use.
Why Choose EdbMails for Zoho Mail Backup to PST?
EdbMails IMAP Backup and Migration Tool is a trusted solution for securely exporting Zoho Mail data to PST files. It’s designed for both individual users and enterprises, providing a fast, reliable, and fully automated way to backup mailboxes.
Key Benefits of EdbMails Zoho Mail to PST Export:
- Direct Zoho to PST export without manual steps.
- Supports all Zoho accounts – personal and business.
- Incremental backup ensures only new emails are backed up after the first export.
- Advanced filters – export by date, sender, or subject.
- Preserves folder hierarchy and metadata exactly as in Zoho.
- Free PST split and merge tools for large mailboxes.
- No size restrictions on the number of mailboxes or mailbox size.
- Detailed log reports after every backup for auditing.
- Secure authentication with Zoho
Step-by-Step Guide: Backup Zoho Mail to PST
Here’s how to perform a Zoho Mail backup using EdbMails:
Step 1: Download and Install EdbMails
- Download and install EdbMails on your Windows system.
- Launch the application and log in using your registered email or choose Start Free Trial.

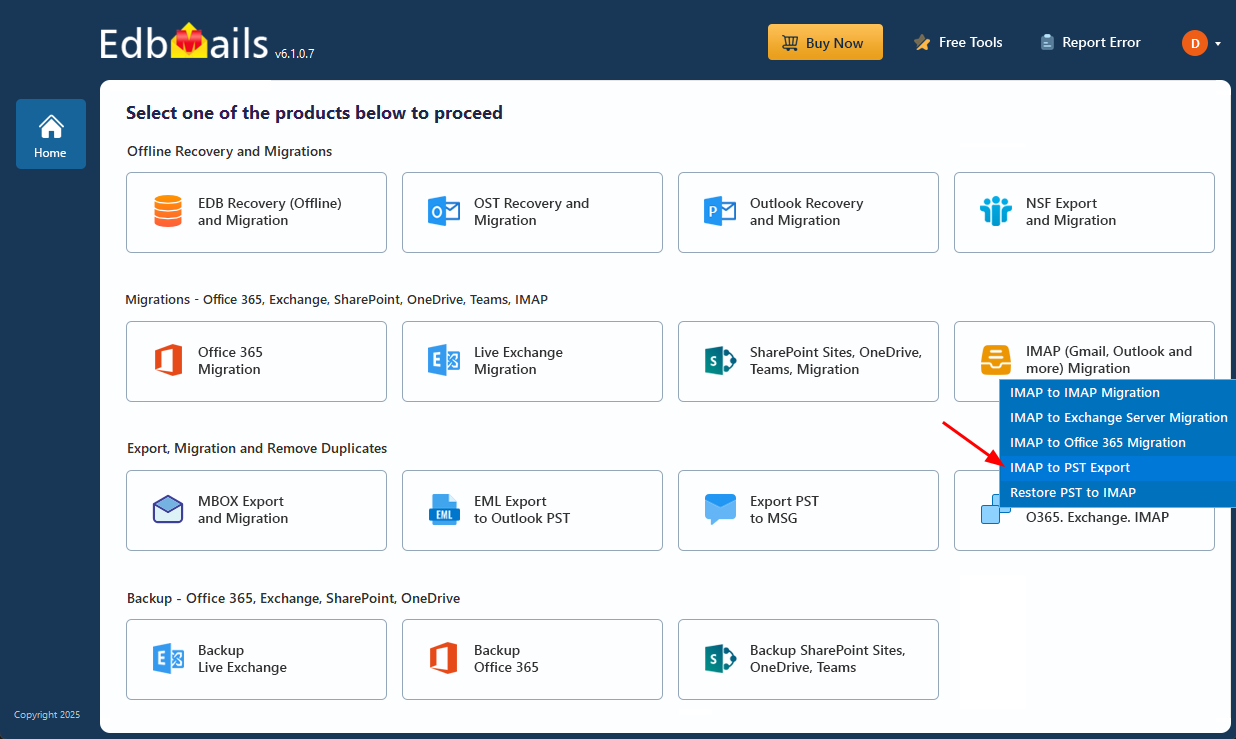
Step 2: Select Zoho Backup Option
- From the dashboard, choose IMAP (Gmail, Outlook & more) Migration.
- Select ‘IMAP to PST Export’.
Step 3: Connect to Zoho Mail Account
- Choose a location on your computer to save the exported PST files.
- For a single mailbox backup, select ‘Single User / Account Migration’ and click ‘Next’ to continue.
- Enter your Zoho Mail ID and app password
- Click Login.
For multiple users:
- Download the sample CSV file.
- Enter Zoho account details (email ID, password, IMAP server, port).
- Upload CSV into EdbMails And Verify the mailboxes
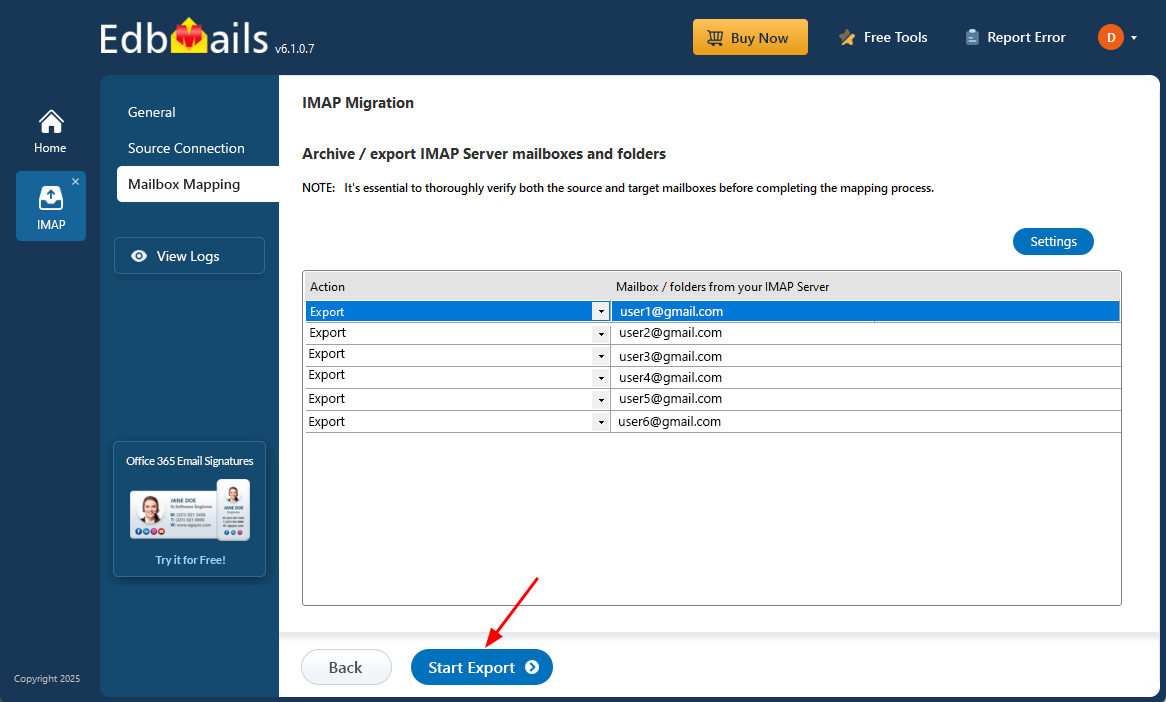
Step 4: Select Mailboxes and Folders
- EdbMails displays all Zoho mailboxes and folders.
- Select the required mailboxes to export to PST.
Step 5: Start the Backup Process
- Click Start Export to begin.
- The progress bar will display real-time status.
- Once complete, EdbMails generates a detailed log report with the count of exported items per folder.
Your Zoho Mail data is now securely stored in PST format.
Advantages of PST Backup for Zoho Mail
- Universal compatibility – PST files can be opened in any Outlook version.
- Offline access – View emails without internet.
- Migration-ready – PSTs can be easily imported into Office 365 or Exchange.
- Archival solution – Store old mailboxes for future reference.
- Disaster recovery – Instant restoration if Zoho services face downtime.
Best Practices for Zoho Mail to PST Backup
To make the most out of your backup strategy:
- Perform regular backups to keep your PST up-to-date.
- Use incremental backup to avoid duplication.
- Store PSTs on external hard drives or cloud storage for redundancy.
- Test PST files using EdbMails Free PST Viewer.
- Document your backup logs for compliance and audits.