In many organizations, the Exchange Server is the central hub for communication and data exchange. When a disaster, system failure, or unexpected issue strikes, restoring the server becomes a top priority. In setups where a single Exchange Server handles all communication workloads, the recovery process can be complex and time-sensitive—especially during critical business operations.
This article focuses on how to address a failed or non-functional Exchange Server. It’s crucial to understand that Active Directory does not retain all essential data. It does not store user mailboxes, public folder databases, third-party SSL certificates, or configuration changes made outside of the Exchange Management tools. If the server goes down, these components may be lost unless you have a reliable recovery method in place—preferably one that can extract data directly from an offline EDB file.
Universal Approach for Database Restoration
There are some techniques to repair the corrupted database.
- Repairing a crashed database is the most common method for recovering or restoring it from the backup.
- DAG (Database Availability Group)
- Advanced recovery procedures can be performed with full administrative access to the Exchange Server installation directories, enabling you to extract and restore critical data using specialized tools and commands.
What actions to be taken if the Exchange server gets totally lost?
If a valid backup does not exist and the deleted Exchange database is not part of a Database Availability Group (DAG), traditional recovery methods cannot be applied. In such scenarios, an alternative or unconventional recovery approach must be considered to retrieve or reconstruct the lost data.
Step 1: Identify the Exchange Server Installation Directory
To begin recovery, locate the original installation directory of the failed Exchange Server using Active Directory Users and Computers and ADSI Edit.
Using Active Directory Users and Computers:
- Open Active Directory Users and Computers.
- Locate the system account for the failed Exchange Server.
- Right-click the account and select Properties.
- Go to the Operating System tab for general system information.
Using ADSI Edit to Get the Install Path:
Open ADSI Edit.
Right-click on the ADSI Edit node and select Connect to.
In the pop-up window, under Select a well-known Naming Context, choose Configuration and click OK.
Expand the following structure:
CN=Configuration
=> DC=Your-Domain
=> CN=Services
=> CN=Microsoft Exchange
=> CN=Your-Exchange-Org-Name
=> CN=Administrative Groups
=> CN=Exchange Administrative Group
=> CN=Servers
Locate the failed server’s name. If found, right-click it and select Properties.
Look for the msExchInstallPath attribute to find the original installation path.
Step 2: Decide the Recovery Strategy
Now decide whether you want to recover Exchange on the same hardware or move to a different one:
- Same Hardware: You can reinstall Exchange without worrying about compatibility.
- Different Hardware: Ensure the new hardware matches the original server specifications (refer to Exchange system requirements).
Once the hardware is ready, reinstall the operating system with the same service pack level as the failed server.
Step 3: Reset the Computer Account in Active Directory
Before rejoining the server to the domain, reset the computer account:
- Open Active Directory Users and Computers.
- Locate the computer object for the failed Exchange Server.
- Right-click the account and choose Reset Account.
- Confirm the action by clicking Yes, then click OK.
Resetting allows you to reuse the original server name and Active Directory object during recovery.
Step 4: Reinstall Operating System and Join Domain
- Install the same version of Windows Server used earlier.
- Assign the same static IP address and server name.
- Join the server to the domain. If domain joining fails, allow some time for Active Directory replication to complete.
Step 5: Prepare for Exchange 2016 Installation
Before installing Exchange:
- Open PowerShell in Administrator mode.
- Ensure the correct version of .NET Framework is installed. If not, download and install it.
- Install UCMA 4.0 (Unified Communications Managed API).
- Reboot the server after installation.
Step 6: Install Exchange Server
- After reboot, open Command Prompt.
- Navigate to the folder containing the Exchange 2016 setup files.
- Run the setup using the appropriate command-line parameters (e.g., /m:RecoverServer) to start recovery mode installation.
Best and Reliable Solution to Recover Exchange Database
Recovering a failed Exchange Server manually can be a complicated and time-consuming process—especially without in-depth technical skills. It often involves restoring Active Directory entries, reconfiguring the server environment, and manually working with EDB and log files. Any misstep in this process could lead to further delays or data inconsistency.
A faster and more dependable approach is to use EdbMails Exchange Server Recovery Software, a purpose-built solution designed for such scenarios. EdbMails allows you to recover and export Exchange mailboxes from offline or corrupted EDB files without needing an active Exchange Server or domain controller.
Highlighted Features of EdbMails Exchange Database Recovery Tool
- Recovers mailboxes, public folders, archive, and shared mailboxes
- Supports granular recovery (emails, contacts, calendars, etc.)
- Direct export to PST, live Exchange Server, or Office 365
- No Active Directory or Exchange dependencies
- Built-in preview of mailbox items before export
- Supports encrypted and large EDB files
- Option to split PST files during export
Exchange Database Recovery in Simple Steps:
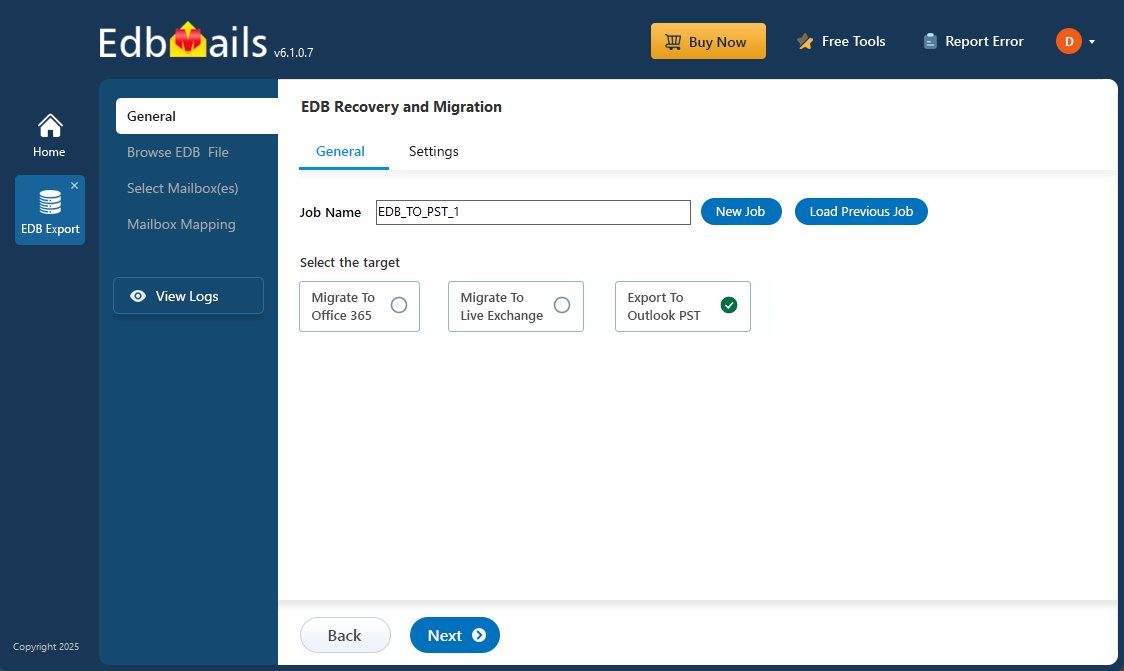
- Download and install EdbMails from the official website
- Select the EDB file you want to recover
- Preview mailbox contents (optional)
- Choose the export option – PST, live Exchange, or Office 365
- Start the export and monitor progress in real time
EdbMails ensures a smooth and stress-free recovery, even when no other manual method is feasible.
See the detailed walkthrough for Exchange EDB recovery and Export.
See Also:
Migrate Office 365 to Exchange