Zimbra has been a reliable email and collaboration platform for many organizations, offering features like email, calendars, tasks, and contacts in a unified interface. However, with the growing shift to cloud platforms, businesses are increasingly moving to Microsoft Office 365 (Microsoft 365) for its flexibility, advanced security, and integration with apps like Teams, SharePoint, and OneDrive. Migrating from Zimbra to Office 365 is a strategic decision that enables organizations to modernize their communication systems and take advantage of Microsoft’s robust cloud services.
That said, Zimbra to Office 365 migration is not a simple task. Zimbra uses a different backend architecture compared to Microsoft 365, and direct migration paths are not readily available. Manual methods often require multiple steps, risk of data loss, and consume valuable IT resources. This is where the EdbMails Zimbra to Office 365 migration tool becomes a game-changer. It simplifies the entire process by securely connecting to your Zimbra server and transferring mailboxes directly to Office 365, preserving folder hierarchy, metadata, attachments, and even shared items.
In this comprehensive guide, we’ll cover:
- The benefits of migrating from Zimbra to Office 365
- Pre-migration checklist and requirements
- Step-by-step process to migrate Zimbra mailboxes using EdbMails
- Security measures to follow during migration
- Post-migration validation and best practices
Whether you’re an IT admin, business owner, or consultant planning a Zimbra to Office 365 migration, this guide will walk you through every step in detail.
Why Migrate from Zimbra to Office 365?
Here are some compelling reasons why organizations are making the switch:
- Cloud Advantage – Office 365 eliminates the need for maintaining on-premise servers and reduces infrastructure costs.
- Collaboration Tools – Integration with Microsoft Teams, SharePoint, and OneDrive enhances team productivity.
- Scalability – Easily scale up or down based on your business needs without worrying about hardware limitations.
- Enhanced Security – Built-in compliance features, multi-factor authentication, and advanced threat protection safeguard sensitive data.
- Anywhere Access – Employees can access their mailboxes securely from any device, anywhere in the world.
By migrating to Office 365, you future-proof your organization’s communication platform and ensure better uptime and reliability.
Pre-Migration Checklist
Before starting the migration, ensure the following checklist is complete:
- Verify Office 365 tenant is set up and licenses are assigned.
- Confirm admin credentials for both Zimbra and Office 365 accounts.
- Backup Zimbra server data for recovery purposes.
- Create a CSV file with mailbox details if planning a bulk migration.
- Ensure a stable internet connection and sufficient bandwidth.
- Disable any antivirus/firewall settings that may interrupt migration.
Step-by-Step Zimbra to Office 365 Migration Using EdbMails
Step 1: Download and Install EdbMails
- Visit the official EdbMails website and download the Zimbra to Office 365 migration tool.
- Install it on your Windows computer following the on-screen instructions.
- Launch the software and log in with your registered account or start a free trial (which allows migrating 30 items per folder).
- Select the option ‘IMAP (Gmail, Outlook & more) Migration’ and ‘IMAP to Office 365 Migration’.
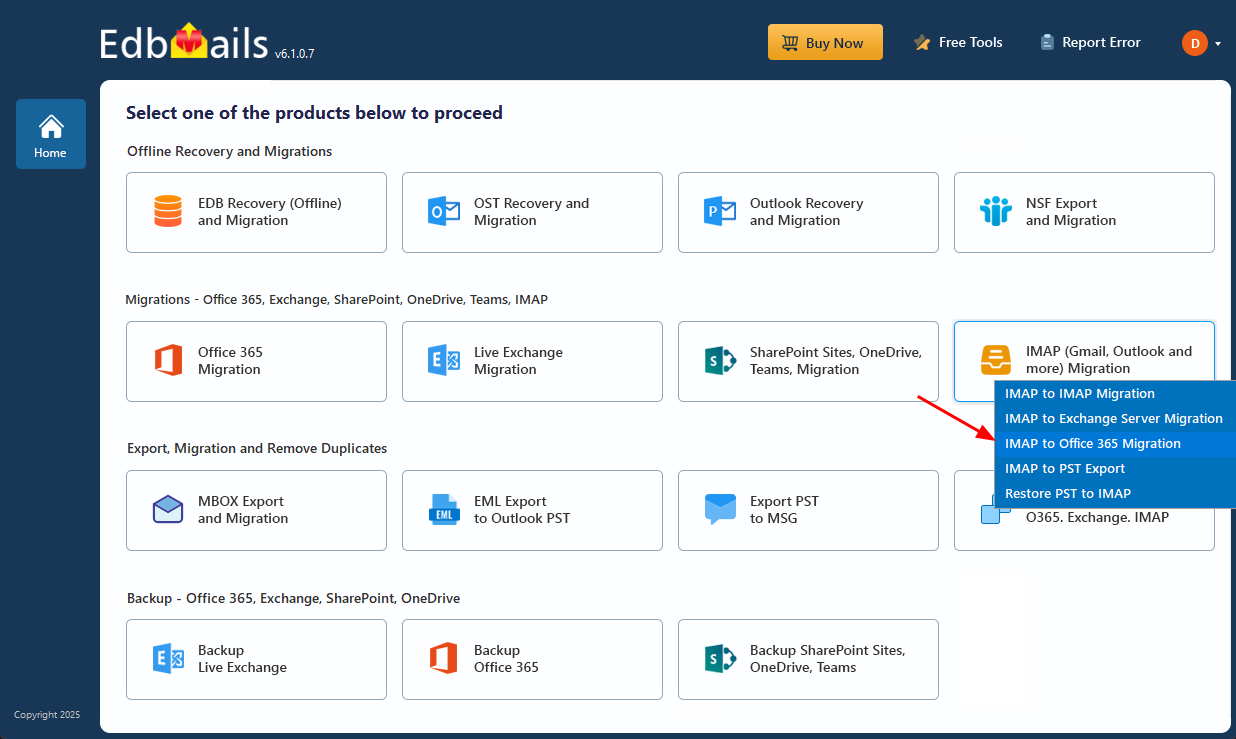
- A default job name is automatically assigned. If you want, click ‘New Job’ to give it a custom name for easier identification.
Step 2: Connect to Zimbra Server
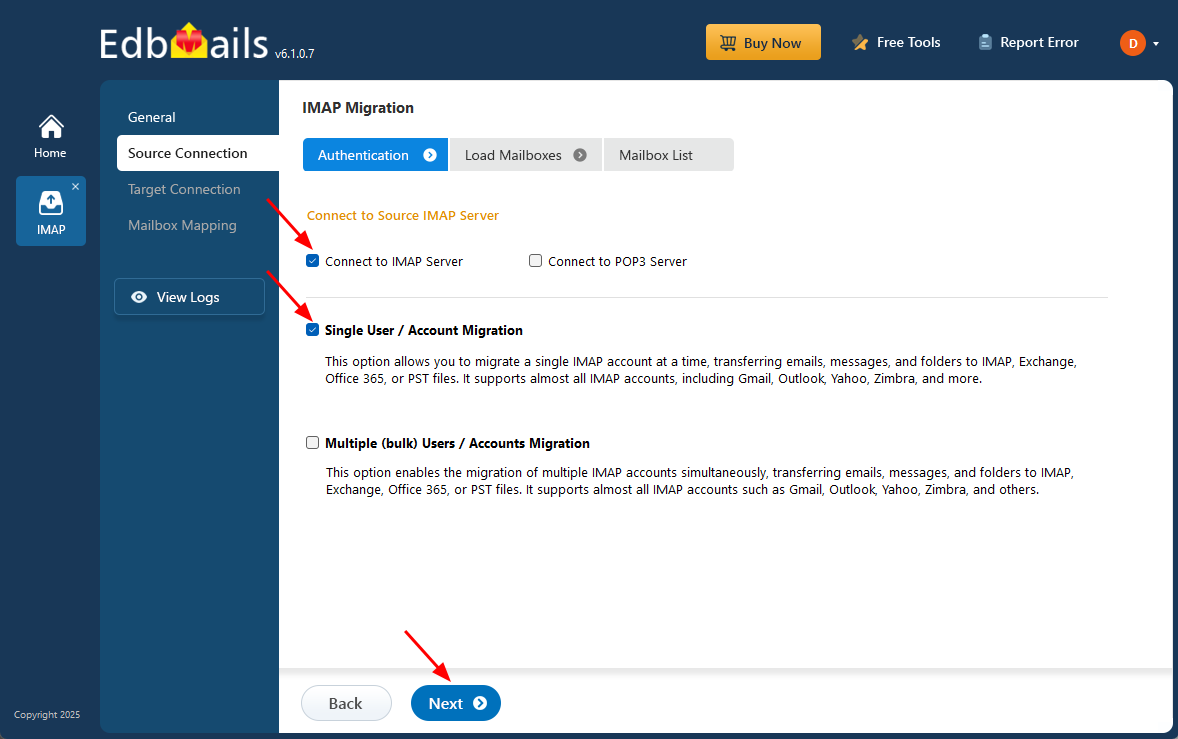
- For migrating just one Zimbra mailbox, select the ‘Single User / Account Migration’ option and press ‘Next’ to move forward.
- Pick the correct IMAP host name for your Zimbra server from the list, or type it in manually if it’s not listed. Then, enter the email address and password.
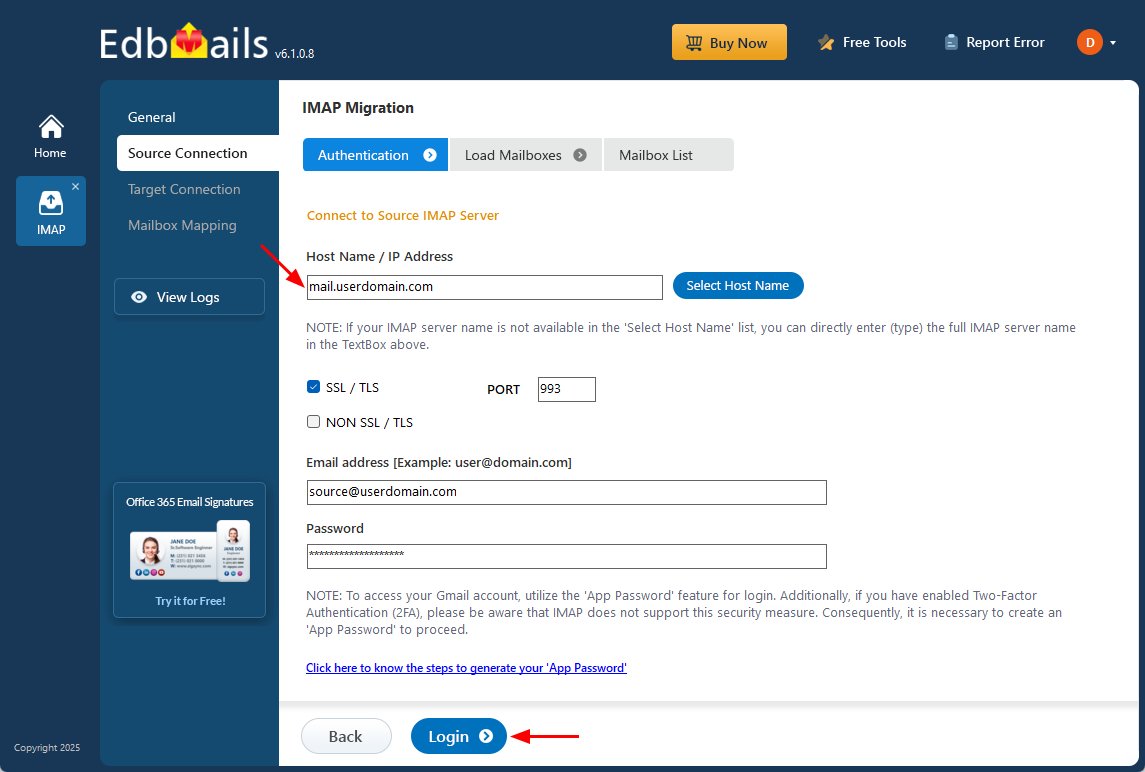
- The software will establish a secure connection and display all available mailboxes.
For the Multiple Mailbox Migration Guide, Read:– Complete Detailed Step-by-Step Zimbra to Office 365 Migration with EdbMails
Step 3: Select Mailboxes for Migration
- Browse the list of Zimbra mailboxes and select the ones you want to migrate.
Step 4: Connect to Office 365 Tenant
- Next, provide your Office 365 global admin credentials.
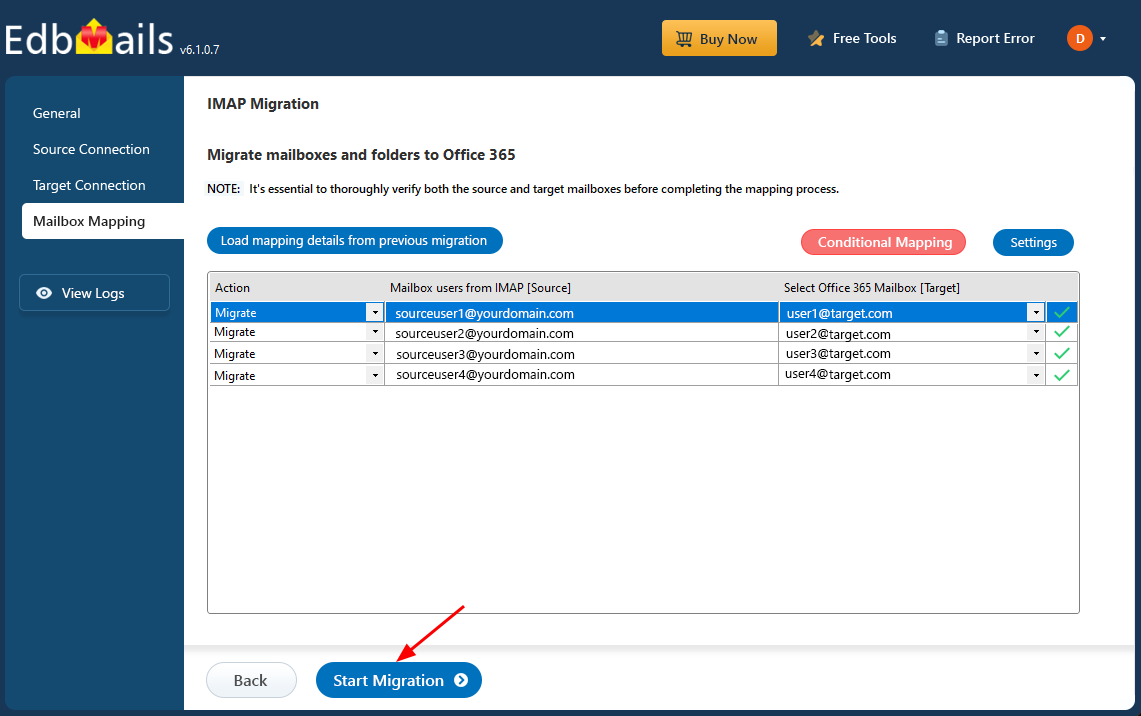
- Select the target user mailboxes in Office 365 where Zimbra data will be imported.
- The tool supports automatic mailbox mapping to speed up the process.
Step 5: Start the Migration
- Click Start Migration to begin.
- Monitor real-time progress through the detailed dashboard.
Security Measures During Zimbra Migration
Migrating critical business emails involves handling sensitive data. Follow these best practices to ensure a secure process:
- Block threats with firewalls and secure email gateways to protect the migration network.
- Enable Multi-Factor Authentication (MFA) for Office 365 accounts to prevent unauthorized access.
- Encrypt all migration traffic using SSL/TLS to ensure data confidentiality.
- Use role-based access controls to limit who can access migration tools and credentials.
- Maintain audit logs and reports for compliance and post-migration verification.
Post-Migration Tasks
After successfully migrating to Office 365, perform the following:
- Verify that emails, calendars, and contacts are intact in Office 365.
- Update DNS and MX records to route emails to Office 365.
- Decommission the Zimbra server if no longer needed.
- Train employees on using Outlook and Office 365 apps.
- Set up backup and archiving solutions for long-term data protection.
Benefits of Using EdbMails for Zimbra to Office 365 Migration
- Direct Migration – No need for intermediate steps like PST exports.
- Zero Downtime – Users can continue working during migration.
- Automatic Mailbox Mapping – Simplifies bulk migration.
- Secure and Compliant – End-to-end encryption ensures safe data transfer.
- Free Trial – Test with 30 items migration per folder before purchase.
Conclusion
Migrating from Zimbra to Office 365 may seem complex, but with the right tool and preparation, it becomes a smooth and secure process. EdbMails simplifies the migration journey with its direct, reliable, and secure approach that preserves your data integrity while minimizing downtime. By following this guide and leveraging EdbMails, organizations can successfully transition to Microsoft 365 and unlock the full potential of modern collaboration and productivity tools.


