Using the New-MailboxRestoreRequest cmdlet, data from a Recovery Database (RDB) can be merged with existing mailboxes. This allows a specific database to be restored from a backup without affecting the active mailbox database, ensuring continuity and minimizing disruption.

To restore mailboxes from a Recovery Database in Exchange Server 2010, follow the methods outlined below:
- Recover a Single Mailbox or Specific Items
Restore individual mailboxes or specific mailbox items from the recovery database without affecting other data. - Dial Tone Recovery on a Different Server
Set up a temporary mailbox database on another server to ensure continued email access for users during the recovery process. - Dial Tone Recovery on the Same Server
Create a dial tone database on the original server to maintain user connectivity while the original mailbox data is being restored in the background.
Restore EDB Mailbox using Recovery Database
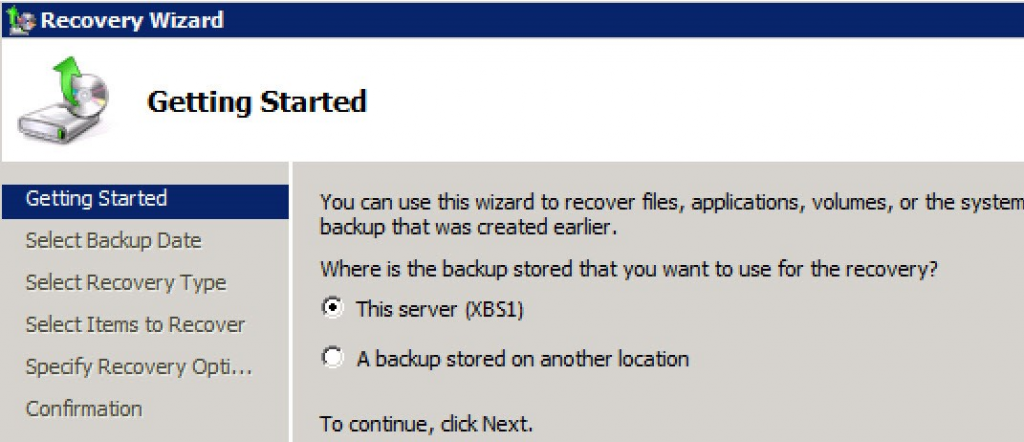
You need to launch Windows Server Backup and go to Actions Pane Click the Recover to start the Recovery Wizard.
Step 1: Restore EDB Mailbox Using Recovery Database
To begin restoring the mailbox database using Windows Server Backup, follow the steps below:
Assumptions:
Database Name: XBS1.edb
In the Actions pane, click Recover to launch the Recovery Wizard.

In the Recovery Wizard, choose the location where your backup is stored (local or remote).
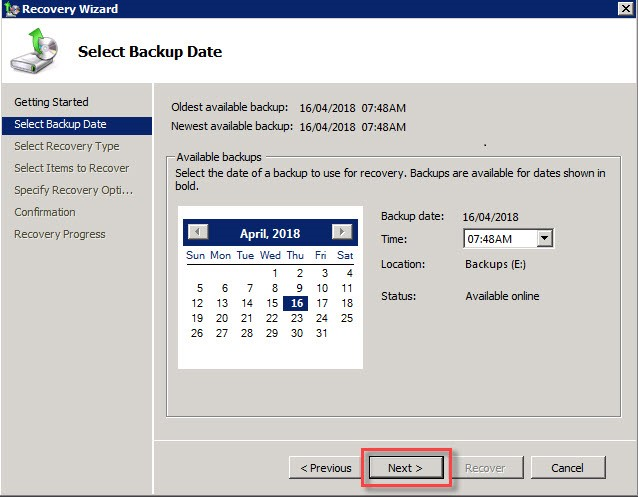
Select the appropriate backup date from which the recovery should begin.
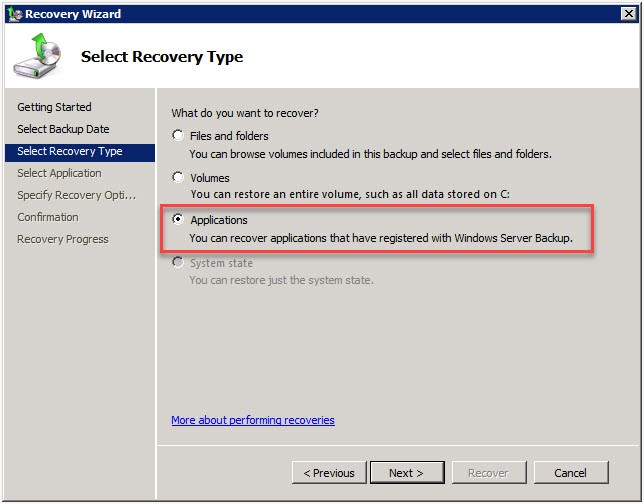
In the ‘Select Recovery Type’ window, choose Applications as the type of data to recover.
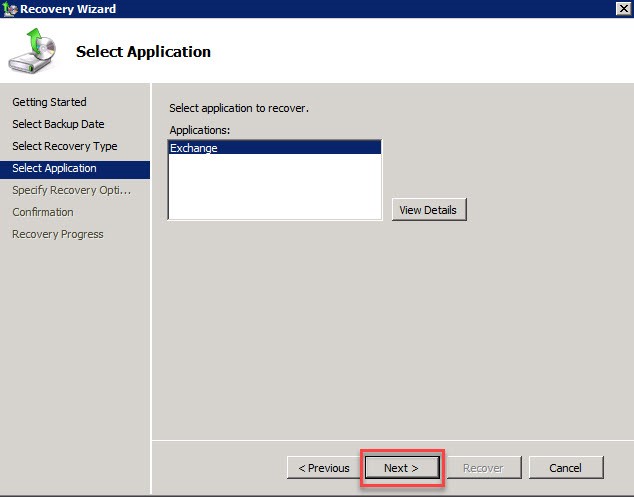
Select Microsoft Exchange Server from the list and click ‘Next’.
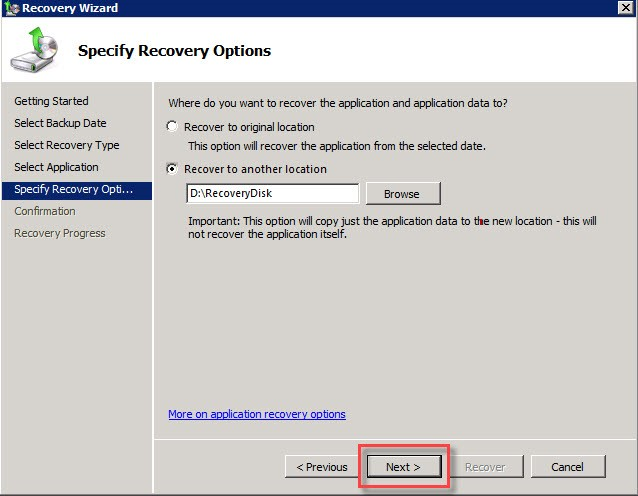
Choose the location where the recovered data should be saved (e.g., D:\RecoveryDisk) and click ‘Next’.
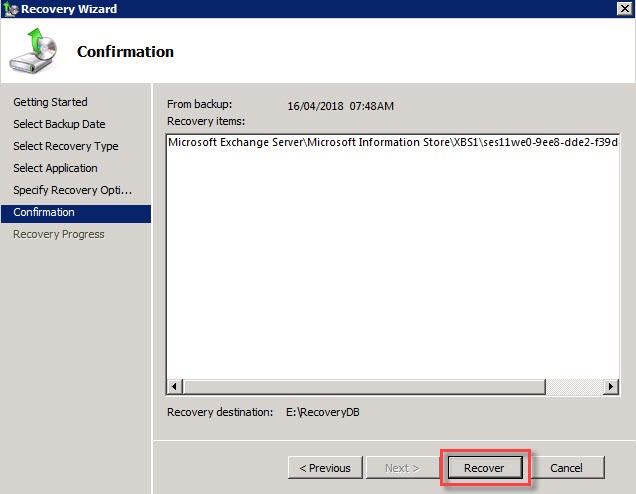
Review all the recovery settings and click ‘Recover’ to start the process.
Wait for the recovery process to complete. Once done, click ‘Close’.
Navigate to the destination folder to verify the restored database files.

Step 2: Bring the Restored Database to a Clean Shutdown State
After completing the database restoration, the next step is to verify and bring the database to a clean shutdown state.
Check Database Status
Run the following command to inspect the current state of the restored .edb file:
C:\Program Files\Exchange Server\bin>eseutil /mh "drive:\Program Files\Exchange Server\MailboxData\test1.edb
After analyzing the output, you will typically see the database in a Dirty Shutdown state, as shown in the screen below.

Repair and Bring Database to Clean Shutdown
To bring the database to a Clean Shutdown state, use the following syntax:
eseutil /r enn /l [Path to log files] /s [Path to checkpoint file] /d [Path to database file] /i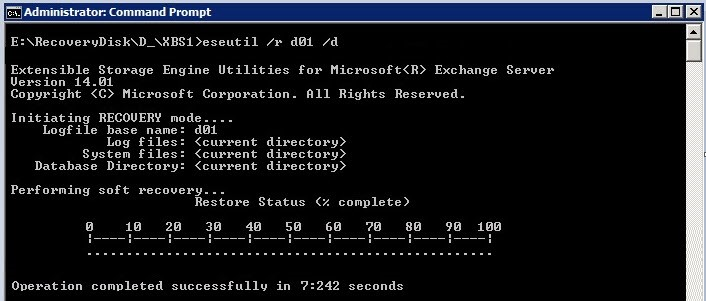
Verify Database State
After running the command, recheck the database status with /mh again. The state should now display Clean Shutdown, confirming that the database is in a mountable and consistent state.

Step 3: Create a Recovery Database and Mount the Restored Database
After bringing the database to a clean shutdown state, the next step is to create a Recovery Database and mount the restored EDB file to it.
Create the Recovery Database
Use the following PowerShell cmdlet to create a recovery database:
New-MailboxDatabase -Recovery -Name Recovery -Server<serverName> -EdbFilePath<databasePath\databaseName.edb> -LogFolderPath <logPath>Replace <ServerName>, <PathToDatabase>, and <PathToLogs> with your actual server name and file paths.
Example:
New-MailboxDatabase -Recovery -Name RecoveryDB -Server EXCH01 -EdbFilePath D:\Recovery\XBS1.edb-LogFolderPath D:\Recovery\Logs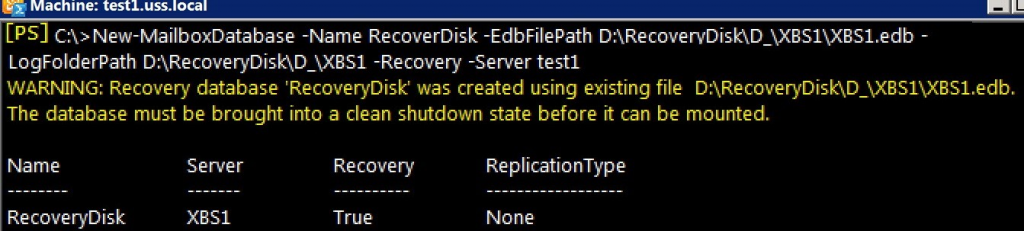
Mount the Recovery Database
Once the recovery database is created, mount it using the command:
Mount-Database RecoveryDBIf the mount is successful, the recovered database is now ready for mailbox or item-level restoration.

Step 4: Verify and Restore Mailboxes from the Recovery Database
After mounting the recovery database, you can view and restore mailboxes using the following steps:
Check Mailbox Statistics
To list the mailboxes within the recovery database:
Get-MailboxStatistics -Database ‘DatabaseName – Recovery’This will display basic information such as mailbox names and item counts.

Get Mailbox GUIDs
To retrieve the GUIDs of mailboxes in the recovery database, use:
Get-MaioboxStatistics -Database ‘DatabaseName -Recovery’ | Format-List DisplayName, MailboxGUIDRestore Mailboxes Using GUID
To restore a specific mailbox from the recovery database to a target mailbox on the live server, use:
New-MailboxRestoreRequest -SourceDatabase ‘DatabaseName -Recovery’ -SourceStoreMailbox MailboxGUID – TargetMailbox TargetMailboxAlias -AllowLegacyDNMismatchReplace <MailboxGUID> with the actual mailbox GUID retrieved in the previous step.
Replace <TargetMailboxAlias> with the alias of the destination mailbox.

Alternative Method to Recover Exchange Database When Backup Is Inaccessible
If your backup is unhealthy or you’re unable to access it, you can recover individual or multiple mailboxes using a specialized Exchange recovery solution. This method allows you to restore data to another server without relying on a working backup.
Additionally, the software supports exporting mailboxes to various formats such as PST, EML, and MSG.
Visit: Exchange Recovery Software EdbMails
Conclusion:
Using a Recovery Database in Exchange Server 2010 is a reliable method to restore individual mailboxes or data after backup failures. While effective, the manual process can be complex and time-intensive. EdbMails Exchange Recovery simplifies this by allowing you to restore mailboxes from corrupted or inaccessible EDB files—without requiring Exchange Server or Active Directory. It supports granular recovery, preview, and export to PST or live Exchange with minimal effort.
See More
Backup and Restore Guide for Exchange Server Data