Migrating Exchange EDB files to Office 365 is a key step for businesses that want to improve security, accessibility, and collaboration with Microsoft’s cloud. Whether you are managing legacy Exchange databases, dealing with server crashes, or facing inaccessible mailboxes, moving to Office 365 ensures seamless data availability, long-term reliability, and simplified IT management.
One of the major challenges organizations face is recovering mailboxes from corrupt or damaged EDB files. Without the right tool, this can put critical business data at risk. That’s where a secure and efficient migration solution becomes essential to maintain data integrity and business continuity.
EdbMails, a Microsoft-partnered migration and recovery solution, makes EDB to Office 365 migration simple with its intuitive step-by-step process. It allows you to directly recover mailboxes from corrupted or inaccessible EDB files and transfer them securely to Office 365. With modern OAuth 2.0 authentication, the migration is safe, automated, and error-free.
EdbMails further supports incremental migration to avoid duplicate data transfer and offers a preview option so you can verify mailbox contents before migration. With its advanced recovery and migration features, EdbMails ensures a fast, reliable, and hassle-free transition to Office 365, while safeguarding your organization’s most critical mailbox data.
Features of EdbMails Exchange EDB to Office 365
- Exchange EDB to Office 365 Migration
EdbMails enables you to migrate emails, contacts, calendars, tasks, journals, and attachments directly from any Exchange EDB file. The migration does not require Microsoft Outlook or a live Exchange Server, making it convenient and accessible for businesses dealing with offline databases. Learn more - Selective Migration to Office 365
EdbMails allows you to choose whether to migrate all mailboxes or only specific folders and items such as emails, contacts, calendars, or tasks. With its graphical interface displaying the complete mailbox and folder hierarchy, you can easily select only the data you need, ensuring a controlled and efficient migration process. - Bulk Mailbox Migration
EdbMails simplifies the migration of multiple mailboxes by supporting bulk operations. Instead of performing manual steps, you can automate the process, transferring data directly from the source EDB file to the target Office 365 environment in a one-to-one manner. - Incremental Migration
EdbMails incremental migration ensures that no duplicate data is created on the target server. If you perform the migration to the same Office 365 account again, only new or changed items are transferred. This saves bandwidth, reduces time, and enhances migration performance. - Secure and Worry-Free Migration
Security is handled through modern OAuth 2.0 authentication with TLS encryption. You log in through the official Microsoft login page, which means your credentials are never stored on EdbMails servers. This ensures a safe, worry-free migration process without compromising data security. Learn more - Repair and Migrate Corrupted EDB Files
Beyond migration, EdbMails also repairs damaged or corrupted EDB files and allows direct migration of the recovered mail items to Office 365 or live Exchange. This makes it an all-in-one tool for recovery and migration, ensuring businesses have a seamless and reliable transition to Microsoft’s cloud platform.
Prerequisites to migrate EDB to Office 365
Before you import the mailboxes from EDB to Office 365, you must prepare the target Office 365 server as described in the following section.
- Ensure network and bandwidth requirements are met for migration
- Prepare the target Office 365 tenant (refer to Microsoft 365 tenant roadmap for guidance)
- Purchase an Office 365 license plan as per your needs (you can also start with a 30-day free trial)
- Create mailboxes for users and assign suitable licenses
Add users and assign licenses to Office 365 accounts
Add multiple users at the same time to Office 365
Assign Microsoft 365 licenses to user accounts - If migrating source Public folders, create and configure Public folder mailboxes on the target Office 365 server.
Create Office 365 Public folder and assign mailbox user - If migrating In-Place archives, enable the archive mailbox on the target Office 365 server.
See steps to enable online archive in Office 365 - Add and verify your custom email domain on Office 365 to continue receiving emails after migration.
Follow the steps to add a custom domain to Office 365 and configure DNS records to connect your domain.
Steps to Import EDB to Office 365
Download and install EdbMails on your computer.
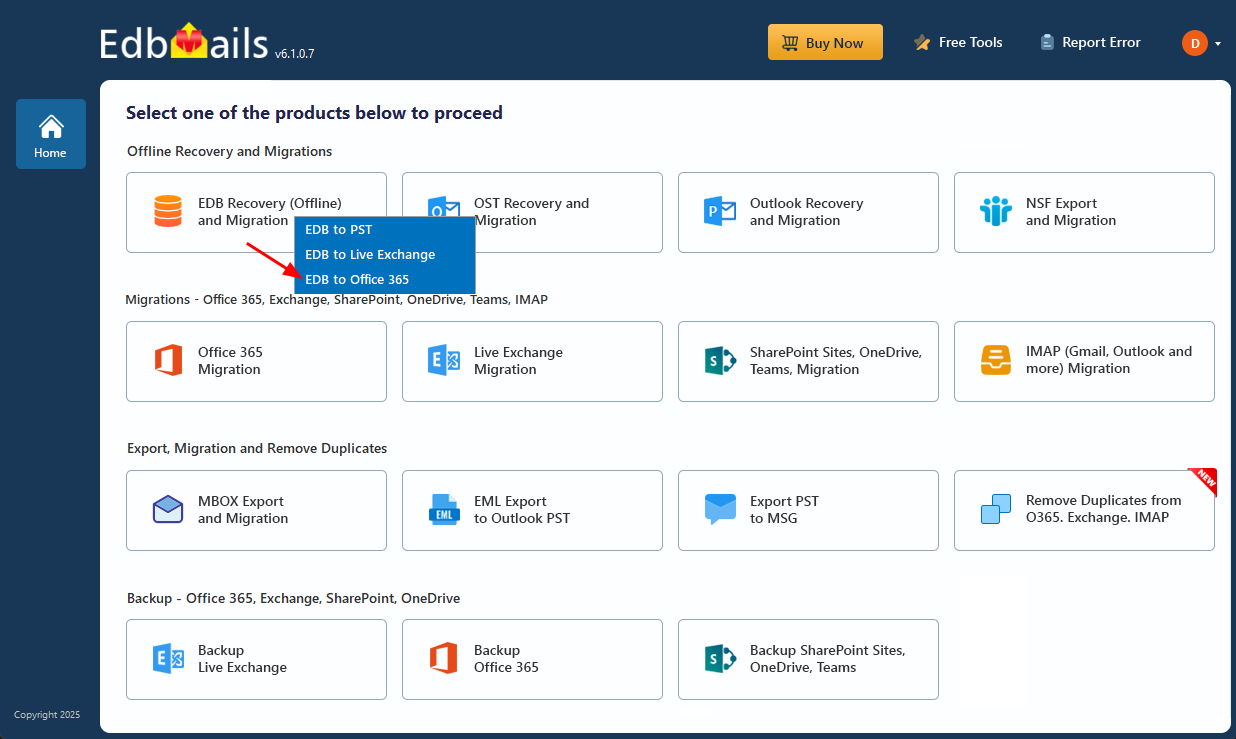
Launch the application, then select EDB Recovery (Offline) and Migration > EDB to Office 365
Enter the job name to continue.
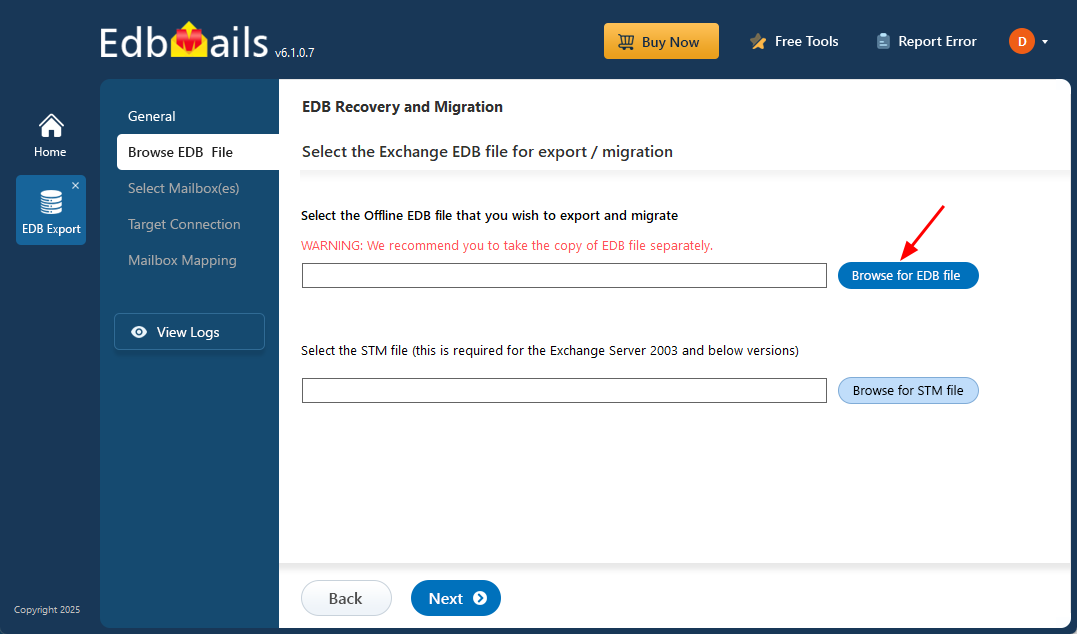
On the next screen, click the ‘Browse for EDB file’ button and navigate to the location of your EDB file.
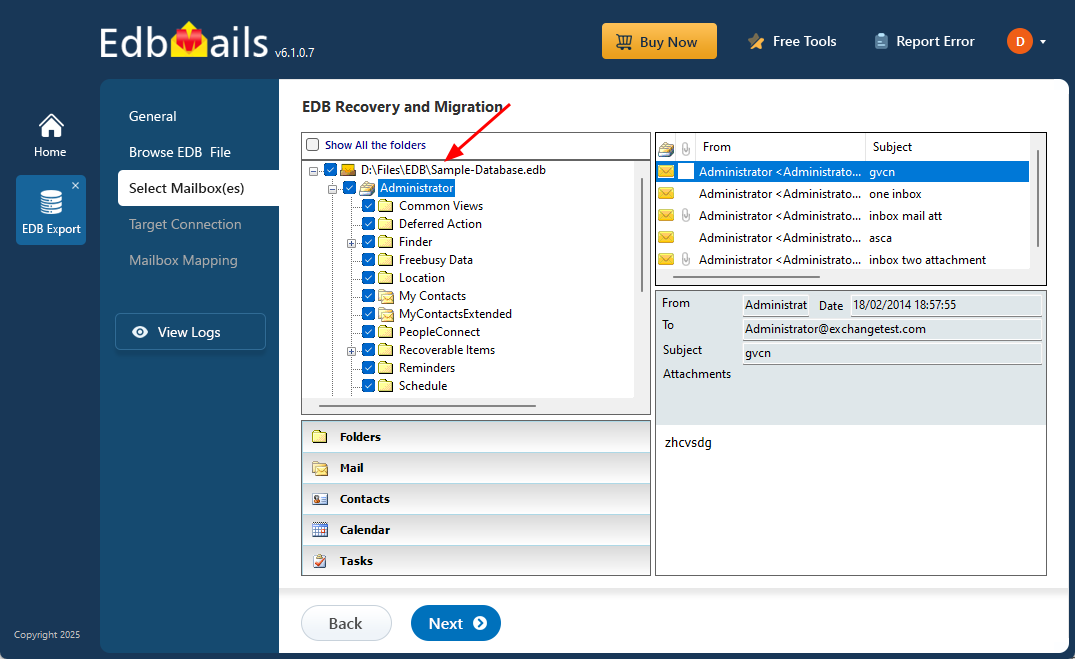
After recovery, you can preview all the mail items, including emails, contacts, folders, notes, tasks, and calendars, directly within the application’s preview pane.
Select the required mailboxes/folders and click the ‘Next’ button to continue.
Establish the connection to the target Office 365 and select the required connection options.
Select the appropriate connection method and click ‘Login’
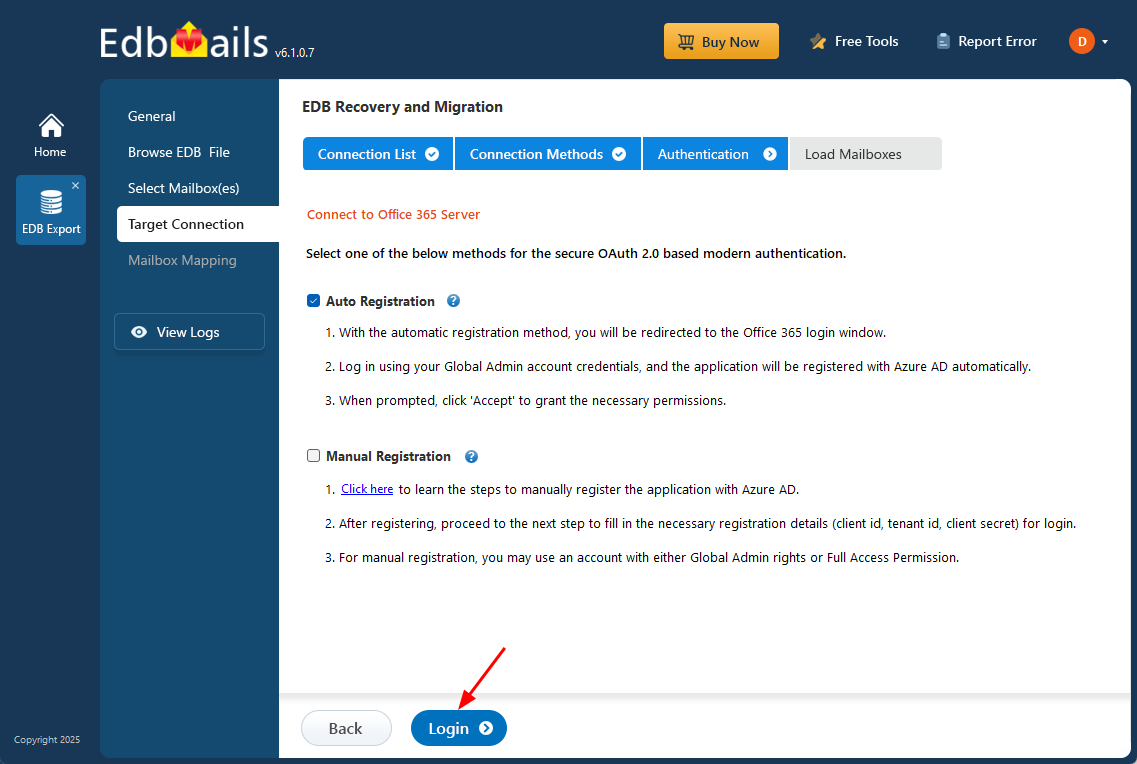
Authenticate on Microsoft Sign-in
Select one of the methods to load the mailboxes.
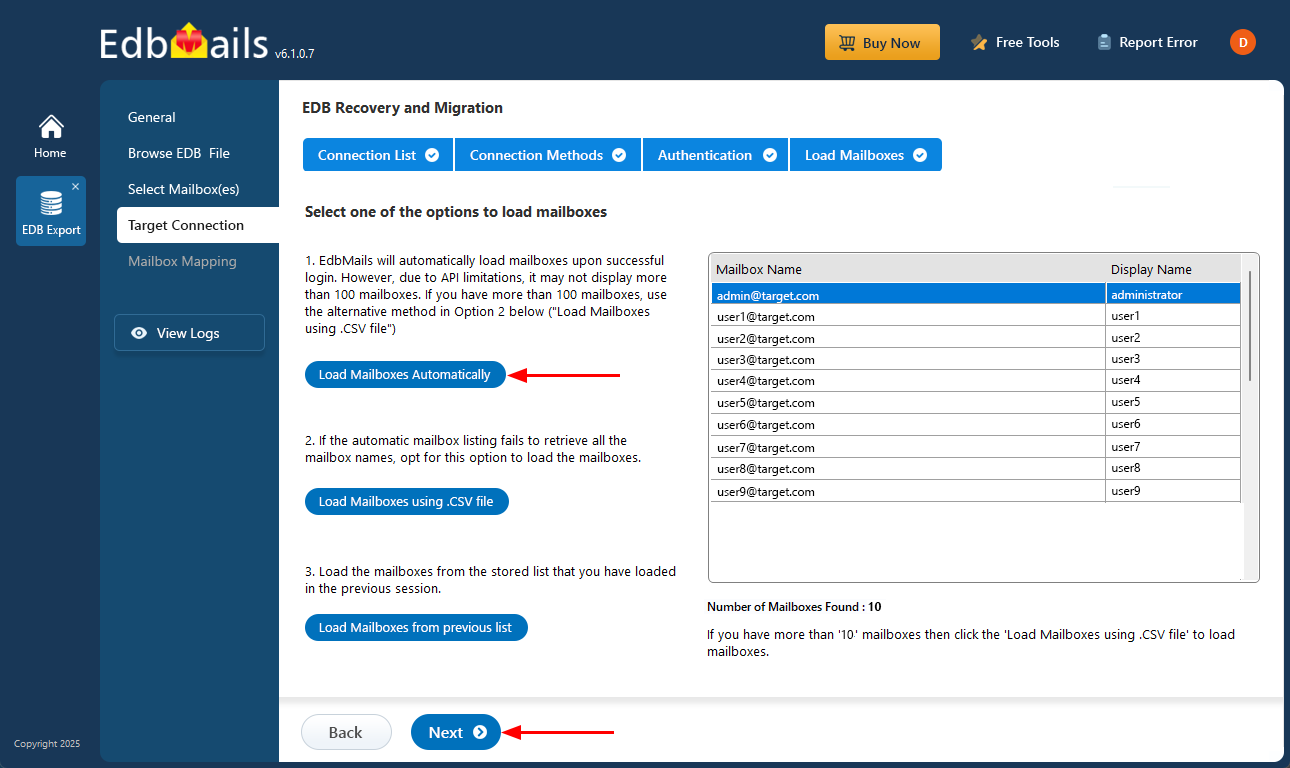
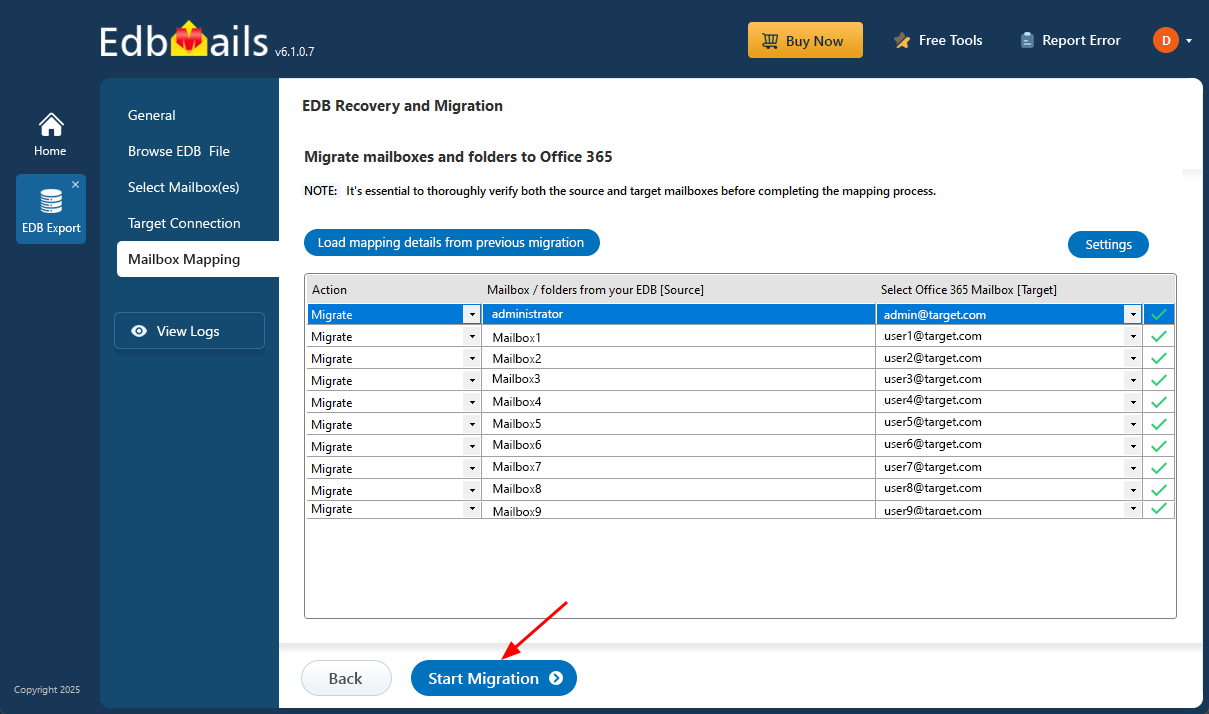
EdbMails automatically maps source and target mailboxes, or you can map them manually. Click ‘Start Migration’ to begin.
You can view the migration progress and pause or resume the operation as needed. After completion, log in to your Office 365 account to verify the migrated items.
Conclusion
Migrating Exchange EDB files to Office 365 can be a complex process, but with the right tools and preparation, it becomes a seamless transition. EdbMails offers a comprehensive solution that simplifies this migration, ensuring data integrity and minimizing downtime. By following the outlined steps and leveraging EdbMails features, organizations can achieve a successful migration to Office 365, enhancing collaboration and productivity in the cloud environment.
Read more :
EDB to live Exchange migration