Recovering data from an old Exchange Server is a critical task for many organizations, especially when dealing with legacy environments, compliance requirements, mergers, migrations, or unexpected server failures. Exchange servers often hold years of business-critical communication, contracts, and sensitive information that must remain accessible and secure. However, unlike simple offline recovery methods, Exchange data recovery involves complexities because users may still be actively sending and receiving emails. Attempting a basic restore could overwrite recent messages, corrupt live transaction files, or even result in partial data loss.

This is where modern recovery tools like EdbMails Exchange Recovery software become indispensable. Instead of struggling with outdated manual methods, IT administrators can rely on EdbMails to quickly restore user mailboxes, emails, contacts, calendars, tasks, and even large archive mailboxes with precision.
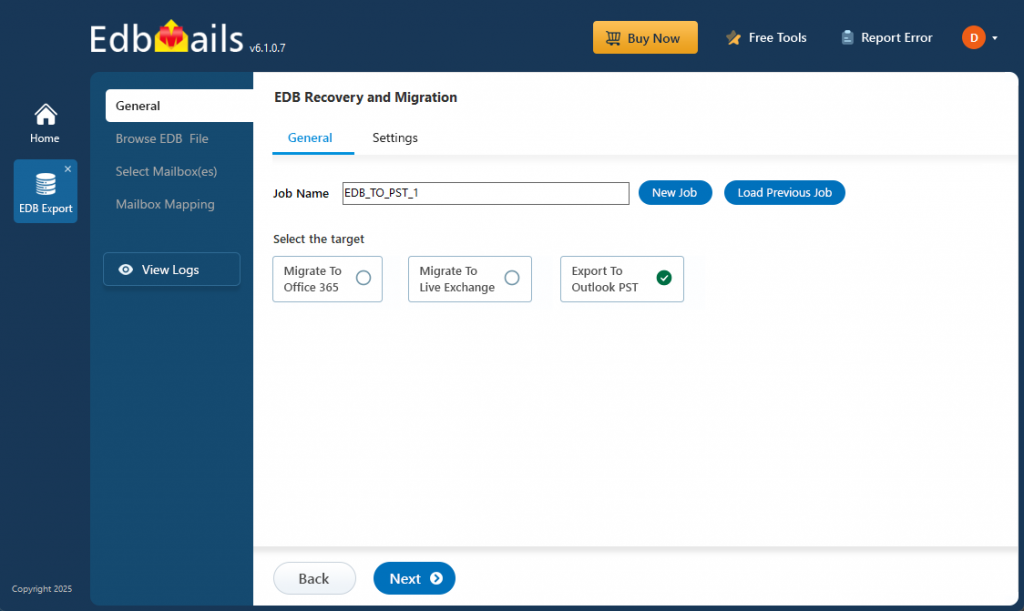
In addition, the built-in EDB to PST converter feature enables you to securely extract and back up data from offline EDB files to PST format, which can later be imported into Outlook or other Exchange environments. This flexibility ensures businesses have both a direct recovery path and a reliable backup option.
EdbMails also provides a seamless way to migrate Exchange mailboxes directly to Microsoft 365 (Office 365) and newer Exchange versions, aligning with current business goals, compliance standards, and cloud adoption strategies. By using EdbMails, businesses not only ensure safe and reliable recovery but also minimize downtime, reduce IT workload, and maintain productivity during critical recovery scenarios.
Why Recovering from an Old Exchange Server Is Challenging
Recovering from old Exchange servers is not straightforward for several reasons:
- Active Mailbox Data: Users continue to send and receive emails, and a traditional backup restore might overwrite new data with outdated content.
- Transaction Consistency: Exchange databases maintain live transaction logs that need careful handling to avoid corruption.
- Version Compatibility: Older Exchange databases may not be natively supported by newer Exchange servers or Microsoft 365 environments.
- Complex Recovery Procedures: Manual methods like Recovery Storage Groups (RSG) require technical expertise and can be time-consuming.
With EdbMails, you can bypass these challenges. It allows you to recover and directly export mailboxes to PST, Microsoft 365, or a live Exchange server, regardless of the Exchange version.
Step-by-Step: Recovering Exchange Server Data Using Recovery Storage Group
1. Restore the Database to a Separate Location
Manually, you must restore the old Exchange database to a secure location with sufficient storage. This prevents overwriting the live production database. However, EdbMails eliminates this requirement by letting you directly open offline EDB files and preview mailboxes without attaching them to a server.
2. Create a Recovery Storage Group (RSG)
- Open Exchange System Manager.
- Navigate to: Administrative Groups → [Your Administrative Group] → Servers → [Your Server].
- Right-click on the server and select New → Recovery Storage Group.
- Provide the path for restored logs and database system files. Ensure the directory has adequate free space and does not conflict with existing databases.
Once completed, the RSG will appear under the server container. Using EdbMails, however, is much simpler — you just load the EDB file into the software and directly access the data.
3. Add the Database to Recover
- Right-click on the RSG container.
- Select Add Database to Recover.
- Choose the information store containing the desired user mailboxes.
Note: Some versions of Exchange (such as Exchange 2000 prior to Service Pack 3) may not be supported for RSG recovery. EdbMails supports Exchange 2003, 2007, 2010, 2013, 2016, and 2019, ensuring much broader compatibility.
4. Validate the Recovery Setup
The selected mailbox store will now be visible under the RSG container. Do not attempt to mount it manually as this may complicate checkpoint file handling. With EdbMails, validation is automatic — you can preview emails, contacts, calendars, and other items before recovery.
Best Practices for Exchange Data Recovery
- Plan Recovery During Non-Business Hours
This minimizes downtime. With EdbMails, you can perform migrations at any time, including outside business hours. - Maintain Backup Copies
Always backup the production environment before performing recovery. EdbMails also allows exporting mailboxes to PST files for extra safety. - Test Recovery Results Before Merging
Validate recovered data before moving it into production. EdbMails enables mailbox preview so you can confirm accuracy. - Document the Recovery Process
Maintain detailed logs for compliance and auditing. EdbMails automatically generates recovery and migration reports.
Modern Alternatives to Manual Recovery
Manual methods like Recovery Storage Groups are time-consuming and limited by compatibility. Modern solutions such as EdbMails provide:
- Granular Recovery: Restore specific mailboxes, folders, or even single items.
- EDB to PST Conversion: Extract and back up mailboxes to PST for Outlook import and long-term archiving.
- Direct Migration: Export data directly to Microsoft 365 or live Exchange servers.
- Broad Compatibility: Works with Exchange versions from 2003 through 2019.
- Speed and Accuracy: Automated processes reduce IT overhead and minimize human error.
- Security and Compliance: Built-in encryption and compliance support for GDPR, HIPAA, and other regulations.
Additional Scenarios Where EdbMails Helps
1. Migrating from Legacy Exchange to Microsoft 365
EdbMails enables direct migrations from older Exchange servers (2003, 2007, 2010) to Microsoft 365 without requiring double-hop upgrades.
2. Handling Corrupted Exchange Databases
Even severely corrupted EDB files can be repaired by EdbMails, ensuring that no mailbox data is lost.
3. Compliance and Legal Requirements
Businesses subject to audits or regulatory reviews can use EdbMails for mailbox archiving, eDiscovery, and long-term storage.
4. Reducing IT Overhead and Complexity
Instead of spending hours configuring RSG and managing transaction logs, IT teams can leverage EdbMails for a quick, automated recovery and migration process.
5. Business Continuity and Disaster Recovery
EdbMails ensures that businesses can quickly restore operations after a server crash, hardware failure, or ransomware attack.
EdbMails Recovery and Migration Guide
For a complete walkthrough on how to recover and convert your Exchange data using EdbMails, visit the official guide:
👉 Recover and Convert Exchange Data with EdbMails
Key Takeaways
- Recovering data from old Exchange Servers is complex due to active mailbox activity, compatibility issues, and live transactions.
- Recovery Storage Groups provide one solution but are time-consuming and limited.
- EdbMails Exchange Recovery provides a modern, reliable, and efficient alternative with support for all major Exchange versions.
- The built-in EDB to PST converter enables secure data extraction, backup, and Outlook integration.
- It enables direct recovery, migration to Microsoft 365, and compliance-ready features.
- Always follow best practices: backup, plan, test, and document the recovery process.
By following this guide and leveraging EdbMails, organizations can ensure complete and secure recovery from old Exchange servers while maintaining business continuity, compliance, and long-term productivity.