In Exchange 2010, database management was handled using the Exchange Management Console (EMC) and the Exchange Control Panel (ECP). With the release of Exchange 2013, these tools were replaced by the Exchange Admin Center (EAC)—a unified, web-based management interface designed for managing on-premises, online, and hybrid Exchange environments.

The EAC enables administrators to perform several key tasks such as:
- Managing user mailboxes and public folders
- Exporting mailboxes to PST files or moving them to another server.
- Monitoring devices connected to the Exchange Server.
- Configuring policies for Outlook Web Access (OWA)
In this section, we’ll guide you through the steps required to export mailboxes to PST using the Exchange Admin Center, along with the prerequisites needed to carry out the operation successfully.
Steps to Export All Mailboxes from Exchange 2013 to Outlook PST Using Exchange Admin Center (EAC)
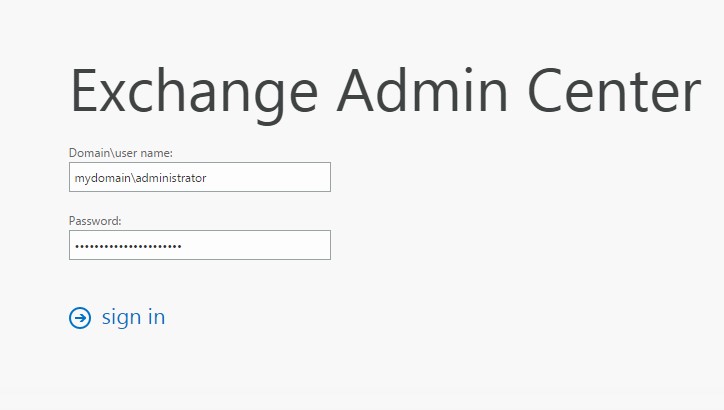
Accessing the Exchange Admin Center (EAC) in Exchange 2013
To access the Exchange Admin Center, follow these steps:
- Open Command Prompt or the Exchange Management Shell on the Exchange server.
- Run the following command to retrieve the EAC URL:
Get-ECPVirtualDirectory | Format-List InternalURL,ExternalURL - Look for the InternalURL in the output.
- Copy the Internal URL and open it in Internet Explorer (or any supported browser) to access the EAC login page.
Once logged in, you can proceed with exporting mailboxes to PST using the features available in the Exchange Admin Center.
Note: The Exchange Admin Center (EAC) may not be accessible on all web browsers or operating system configurations. Refer to the supported OS and browser combinations listed below to ensure compatibility.
Supported Web browsers and Operating Systems
| Web browser | Windows XP & Windows Server 2003 | Windows Vista | Windows 7 & Windows Server 2007 | Windows 8 & Windows Server 2012 | Mac OSX | Linux |
| Internet Explorer 8 | Supported | Supported | Premium | Unsupported | Unsupported | Unsupported |
| Internet Explorer 9 | Unsupported | Supported | Premium | Unsupported | Unsupported | Unsupported |
| Internet Explorer 10 or later | Unsupported | Supported | Premium | Premium | Unsupported | Unsupported |
| Firefox 11 or later | Supported | Supported | Premium | Premium | Premium | Supported |
| Safari 5.1 or later | Unsupported | Unsupported | Unsupported | Unsupported | Premium | Unsupported |
| Chrome 18 or later | Supported | Supported | Premium | Premium | Premium | Unsupported |
Steps to Set Up Required Permissions for Mailbox Export
Step 1: Create a Shared Folder to Store the Exported PST File
Create a shared folder on the network to save the exported mailbox data. Ensure that the folder is not located on the ‘C:’ drive (e.g., avoid C:\ExportPST) to prevent permission and access-related issues.

Assign Full Control permissions to the Exchange Trusted Subsystem (ETS) for the shared folder you created. Ensure that full access is granted at both the Share and Security level to the ETS.
Share Permission

Security Permission

Step 2: Assign Import-Export Role to the Mailbox
To export a mailbox (e.g., “sharedesk”) to a PST file, you must first assign the necessary Mailbox Import Export permissions. By default, this role is not assigned to any user or group.
Follow these steps using the Exchange Admin Center (EAC):
Open the Exchange Admin Center and navigate to the Permissions tab in the left-hand pane.

Under the ‘Admin Roles’ section, select ‘Recipient Management’, then click the ‘Add’ button at the top of the screen.

In the ‘Select a Role’ dialog, choose ‘Mailbox Import Export’, click Add → button and then click OK.
Click ‘Add’ under Members to assign the role to specific mailboxes (e.g., “sharedesk”) and click ‘Save’.
Steps to Export Exchange Server 2013 Mailbox to PST
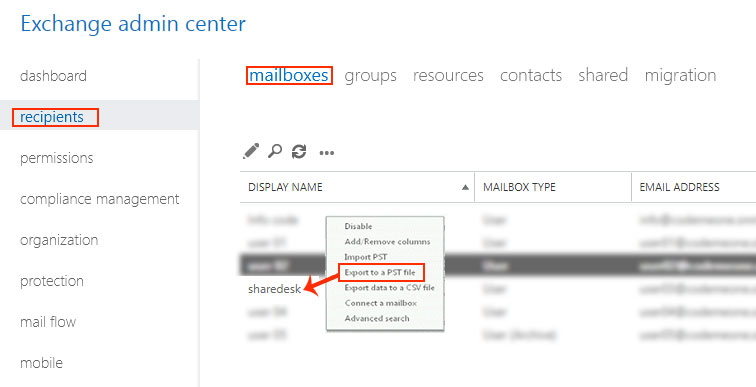
Open the ‘Exchange Admin Center (EAC)’ and navigate to the ‘Mailboxes’ tab. This section displays all available mailboxes linked to the database that can be exported. Locate and right-click the mailbox you want to export, then select ‘Export to a PST file’.
In the pop-up window, the mailbox name will be auto-filled for export.

Next, specify the destination path where the PST file should be saved using the UNC format:
\\ServerName\SharedFolder\ExportFile.pst

Choose the mailbox where a notification should be sent once the export is complete, and click Finish to start the process.

After the export finishes, the PST file can be imported back into Exchange Server or opened directly in Microsoft Outlook.
Solution to Export Exchange Server Mailbox or Database to PST
The built-in export method works only when the mailbox is active on a live Exchange Server. If the database is offline or corrupted, this method won’t be effective. In such cases, EdbMails EDB to PST Converter offers a reliable alternative. It allows you to recover and export mailboxes from both healthy and damaged EDB files to PST format, even when the Exchange Server is inaccessible.
Key benefits of using EdbMails EDB to PST Converter:
- Create a separate PST file for each mailbox
- Option to split large PST files during export
- Supports multiple export formats: PST, EML, and MSG
- Migrate mailboxes directly to other Exchange Servers or Office 365
EdbMails Application efficiently scans and extracts data from EDB files, allowing you to migrate complete or selective mailboxes to a live Exchange Server.
You can try the application using the Free Trial version to explore its features and assess its functionality.
Conclusion:
Exporting mailboxes from Exchange 2013 to PST is possible via the Exchange Admin Center when the server and mailboxes are accessible. However, if the database is offline or corrupted, native methods may fail. In such cases, EdbMails EDB to PST Converter offers a reliable solution to recover and export mailboxes without data loss. It supports selective export, multiple formats, and direct migration to Office 365 or another Exchange Server.
See More:
Convert Exchange EDB to PST using these Free methods